Hugo 靜態網站 SEO + AEO 完整實作筆記:從 schema 到 llms.txt
把部落格從「只給人看」升級到「也給 AI 看」,這篇文章記錄了整個過程——包括踩到的坑。
為什麼現在要做 AEO
2025 年之後,流量的入口已經分裂成兩條路:
- 傳統搜尋引擎(Google、Bing)→ 依然重要,排名決定曝光
- AI 答案引擎(Perplexity、ChatGPT Search、Google AI Overviews)→ 快速成長,直接引用內容回答問題
如果你的網站只做了 SEO,AI 引擎在回答相關問題時可能完全不引用你,即使你的內容是最完整的。AEO 的核心是讓 AI 系統能夠「讀懂」你的內容並信任你是可靠來源。
現況盤點:Hugo 靜態網站 SEO 的基礎
開始動工前先盤點現有基礎。一個典型的 Hugo 部落格通常已經有:
<meta name="description">與 Open Graph 基礎標籤<link rel="canonical">- RSS Feed
- Hugo 自動產生的
sitemap.xml - 基本的 JSON-LD Article schema
但缺少的項目往往更關鍵:
| 缺少的項目 | 影響 |
|---|---|
robots.txt | Googlebot 行為不可控,AI 爬蟲沒有明確許可 |
og:image | 社群分享沒有預覽圖,點擊率偏低 |
meta name="robots" | 無法告訴 Google 允許大圖摘要與長片段 |
| BreadcrumbList schema | 缺少 Google 麵包屑富摘要 |
wordCount、articleSection | Article schema 不完整 |
speakable schema | 無法被語音搜尋與 AI 朗讀摘要 |
llms.txt | AI 引擎沒有結構化的站點入口 |
| FAQPage schema | Google AI Overviews 無法直接抽取 Q&A |
| E-E-A-T 作者信號 | AI 引擎無法判斷內容可信度 |
實作一:robots.txt
沒有 robots.txt 並不代表所有爬蟲都被允許,只是讓爬蟲行為變得不可預測。更重要的是,現在需要明確告訴 AI 爬蟲「你們可以來」。
把以下內容放到 static/robots.txt:
User-agent: *
Allow: /

# AI crawlers — allow for AEO
User-agent: GPTBot
Allow: /

User-agent: ClaudeBot
Allow: /

User-agent: PerplexityBot
Allow: /

User-agent: anthropic-ai
Allow: /

Sitemap: https://your-domain.com/sitemap.xml
坑一:Cloudflare Managed robots.txt
部署之後用 curl 測試,發現回傳的不是我們的檔案,而是 Cloudflare 的「Content Signals Framework」:
curl -s https://your-domain.com/robots.txt
# As a condition of accessing this website, you agree to abide by the following
# content signals:
# search: building a search index...
# ai-input: inputting content into one or more AI models...
# ai-train: training or fine-tuning AI models.
這是 Cloudflare 的「Managed robots.txt」功能,會直接覆蓋掉你的靜態檔案。
解決方法:
Cloudflare Dashboard → Scrape Shield → Managed robots.txt → 關閉
關閉後 curl 就能拿到自己的 robots.txt 了。
坑二:Cloudflare 預設封鎖 AI 爬蟲
即使 robots.txt 正確,Cloudflare 從 2025 年 7 月起對新加入網域預設封鎖所有 AI bot。這個封鎖發生在網路層,在請求到達你的 server 之前就被 drop 掉,所以 robots.txt 完全沒有機會被讀到。
被封鎖的包含:
PerplexityBotGPTBot(ChatGPT Search)ClaudeBot(Anthropic)anthropic-ai
解決方法:
Cloudflare Dashboard → Security → Bots → AI Scrapers and Crawlers → Off
重要區別:這裡設成 Off 是讓所有 AI bot 通過,然後靠
robots.txt自己精細控制。如果你想繼續封鎖用來「訓練模型」的爬蟲(如 CCBot、Common Crawl),可以用 Cloudflare WAF 規則針對特定 User-Agent 封鎖,而不是全部擋掉。
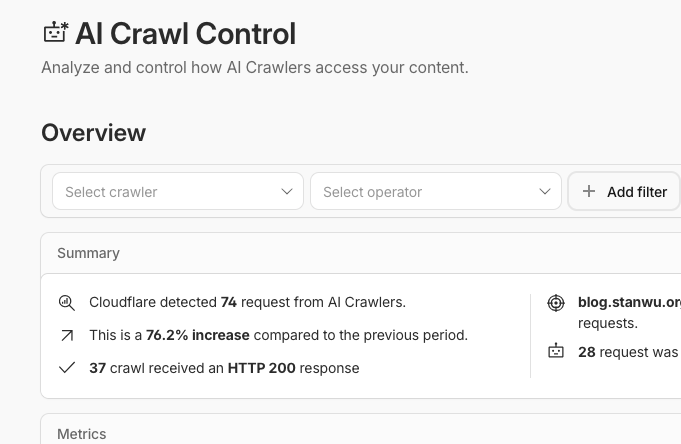
關閉後,可以在 Cloudflare Dashboard 的 AI Crawl Control 頁面看到 AI 爬蟲的請求統計,確認爬蟲是否已順利抵達你的網站:
實作二:og:image 與 Twitter Card
og:image 是社群分享時顯示預覽圖的關鍵。沒有這個標籤,文章分享到 Facebook、LINE、Twitter 時只會顯示一個空白方塊。
在 layouts/partials/head.html 加入:
{{/* OG Image:優先用文章自訂圖,否則用站點預設 */}}
{{ $ogImage := "" }}
{{ if .Params.image }}
  {{ $ogImage = .Params.image | absURL }}
{{ else }}
  {{ $ogImage = site.Params.og_image | absURL }}
{{ end }}

<meta property="og:image" content="{{ $ogImage }}">
<meta property="og:image:width" content="1200">
<meta property="og:image:height" content="630">
<meta name="twitter:card" content="summary_large_image">
<meta name="twitter:image" content="{{ $ogImage }}">
同時在 config/_default/params.toml 加入預設圖路徑:
og_image = "/images/og-default.png"
文章 front matter 可以個別指定:
image: "/images/posts/my-article-cover.png"
實作三:meta name="robots" 完整指令
這個標籤告訴 Google 允許哪些摘要方式。max-image-preview:large 讓 Google 在搜尋結果顯示大圖;max-snippet:-1 允許顯示任意長度的文字摘要。
<meta name="robots" content="index, follow, max-image-preview:large, max-snippet:-1, max-video-preview:-1">
沒有這行,Google 可能只顯示小圖或截短摘要,直接影響點擊率。
實作四:完整的 Article schema
基本的 Article schema 只有標題、日期、作者,但完整版還要加上 wordCount、articleSection、speakable。
layouts/partials/schema.html:
{{ if .IsPage }}
<script type="application/ld+json">
{
  "@context": "https://schema.org",
  "@type": "{{ .Params.schema_type | default "Article" }}",
  "headline": {{ .Title | jsonify }},
  "description": {{ with .Params.description }}{{ . | jsonify }}{{ else }}{{ .Summary | plainify | truncate 160 | jsonify }}{{ end }},
  "datePublished": "{{ .Date.Format "2006-01-02T15:04:05Z07:00" }}",
  "dateModified": "{{ .Lastmod.Format "2006-01-02T15:04:05Z07:00" }}",
  "url": "{{ .Permalink }}",
  "wordCount": {{ .WordCount }},
  {{ with .Params.categories }}"articleSection": {{ index . 0 | jsonify }},{{ end }}
  "author": {
    "@type": "Person",
    "name": "{{ site.Params.schema.person_name }}",
    "url": "{{ site.Params.schema.person_url }}"
  },
  "image": {{ with .Params.image }}{{ . | absURL | jsonify }}{{ else }}{{ site.Params.og_image | absURL | jsonify }}{{ end }}
  {{ with .Params.tags }},
  "keywords": [{{ range $i, $v := . }}{{ if $i }}, {{ end }}{{ $v | jsonify }}{{ end }}]
  {{ end }},
  "speakable": {
    "@type": "SpeakableSpecification",
    "cssSelector": [".post-header h1", ".post-summary", ".content > p:first-child"]
  }
}
</script>
{{ end }}
speakable 標記的 CSS selector 告訴 Google 哪些段落「適合被朗讀」,這是語音搜尋和 AI 口語摘要的依據。
實作五:BreadcrumbList schema
BreadcrumbList 讓 Google 在搜尋結果中顯示路徑導覽(「首頁 › 文章 › 文章標題」),提升點擊意願。
<script type="application/ld+json">
{
  "@context": "https://schema.org",
  "@type": "BreadcrumbList",
  "itemListElement": [
    {
      "@type": "ListItem",
      "position": 1,
      "name": "首頁",
      "item": "{{ site.BaseURL }}"
    },
    {
      "@type": "ListItem",
      "position": 2,
      "name": "文章",
      "item": "{{ "posts/" | absURL }}"
    },
    {
      "@type": "ListItem",
      "position": 3,
      "name": {{ .Title | jsonify }},
      "item": "{{ .Permalink }}"
    }
  ]
}
</script>
實作六:llms.txt(AEO 的核心)
llms.txt 是 llmstxt.org 推動的新興標準。概念類似 robots.txt,但目標是幫助 LLM 理解網站,而不是控制爬蟲行為。
格式是 Markdown,放在網站根目錄 /llms.txt:
# Stan Wu 吳信典

> 拆解被包裝過的東西、數位自主權實踐、非典型理財觀

## 重要頁面

- [首頁](https://your-domain.com/): 最新文章列表
- [關於](https://your-domain.com/about/): 關於作者

## 文章

- [文章標題](https://your-domain.com/posts/slug/): 摘要描述
...

## 關於作者

專長領域:DevOps、Python、Linux、資訊安全...
在 Hugo 中用 custom output format 動態產生,確保文章清單永遠是最新的。
config/_default/hugo.toml 加入輸出格式:
[outputs]
  home = ["HTML", "RSS", "JSON", "LLMS"]

[outputFormats.LLMS]
  mediatype = "text/plain"
  baseName = "llms"
  isPlainText = true
  notAlternative = true
layouts/index.llms.txt 模板:
# {{ site.Title }}

> {{ site.Params.description }}

## 文章

{{ range where .Site.RegularPages "Section" "posts" }}{{ if not .Params.draft }}- [{{ .Title }}]({{ .Permalink }}){{ with .Summary }}: {{ . | plainify | truncate 120 }}{{ end }}
{{ end }}{{ end }}
實作七:FAQPage schema
FAQPage 是 AI Overviews 和 Google 精選摘要最喜歡的格式,AI 引擎會直接從 FAQ 提取問題和答案作為回覆。
在 Hugo 中透過 front matter 的 faq 陣列驅動,schema partial 自動輸出:
# 文章 front matter
faq:
  - q: "問題一?"
    a: "詳細的答案..."
  - q: "問題二?"
    a: "詳細的答案..."
schema.html 對應的輸出:
{{ with .Params.faq }}
<script type="application/ld+json">
{
  "@context": "https://schema.org",
  "@type": "FAQPage",
  "mainEntity": [
    {{ range $i, $item := . }}{{ if $i }},{{ end }}
    {
      "@type": "Question",
      "name": {{ $item.q | jsonify }},
      "acceptedAnswer": {
        "@type": "Answer",
        "text": {{ $item.a | jsonify }}
      }
    }
    {{ end }}
  ]
}
</script>
{{ end }}
實作八:E-E-A-T 作者信號(knowsAbout)
Google 和 AI 引擎判斷內容可信度的方式之一是 E-E-A-T(Experience、Expertise、Authoritativeness、Trustworthiness)。在 Person schema 中加入 knowsAbout 欄位,明確宣告作者的專長領域。
config/_default/params.toml:
[schema]
  person_name = "你的名字"
  person_url = "https://your-personal-site.com"
  person_same_as = [
    "https://github.com/your-handle",
  ]
  knows_about = [
    "Linux 系統管理",
    "DevOps",
    "Python",
    "nginx",
    "資訊安全",
  ]
head.html 的 Person schema:
<script type="application/ld+json">
{
  "@context": "https://schema.org",
  "@type": "Person",
  "name": "{{ site.Params.schema.person_name }}",
  "url": "{{ site.Params.schema.person_url }}"
  {{ with site.Params.schema.person_same_as }},
  "sameAs": [{{ range $i, $v := . }}{{ if $i }}, {{ end }}"{{ $v }}"{{ end }}]
  {{ end }}
  {{ with site.Params.schema.knows_about }},
  "knowsAbout": [{{ range $i, $v := . }}{{ if $i }}, {{ end }}"{{ $v }}"{{ end }}]
  {{ end }}
}
</script>
sameAs 把你的 GitHub、社群媒體帳號連結起來,幫助 AI 引擎將「散落在各處的你」識別為同一個人,強化權威性。
實作九:閱讀時間顯示
閱讀時間對 UX 有直接幫助——讓讀者在點進文章前知道需要花多少時間,降低跳出率。Hugo 內建 .ReadingTime 變數,直接在文章 meta 中使用:
<span class="reading-time">{{ .ReadingTime }} 分鐘閱讀</span>
驗證方式
快速驗證:curl
最直接的方式,用不同 User-Agent 模擬不同爬蟲:
# 確認 robots.txt 是自己的內容
curl -s https://your-domain.com/robots.txt

# 確認 llms.txt 存在
curl -s https://your-domain.com/llms.txt

# 用 Googlebot 身份抓頁面,確認 schema 存在
curl -s -A "Googlebot" https://your-domain.com/posts/your-post/ | grep -o 'application/ld+json'
完整驗證:Python 模擬爬蟲
寫一支 Python 腳本,模擬 PerplexityBot 爬蟲,逐項檢查所有 SEO/AEO 信號:
import urllib.request, re, json

BASE = "https://your-domain.com"
HEADERS = {
    "User-Agent": "Mozilla/5.0 (compatible; PerplexityBot/1.0; +https://perplexity.ai/bot)",
}

def fetch(url):
    req = urllib.request.Request(url, headers=HEADERS)
    with urllib.request.urlopen(req, timeout=10) as r:
        return r.read().decode("utf-8")

def check(label, condition):
    print(f"  {'✅' if condition else '❌'} {label}")

# 抓文章頁
html = fetch(f"{BASE}/posts/your-post/")

# Hugo --minify 會把 <script type="application/ld+json"> 的引號移除
# 必須用無引號的 regex 才能正確比對
blocks = re.findall(
    r'<script type=application/ld\+json>(.*?)</script>', html, re.DOTALL
)

types = []
has_breadcrumb = has_speakable = has_wordcount = has_faqpage = has_knowsabout = False

for block in blocks:
    data = json.loads(block)
    t = data.get("@type", "")
    types.append(t)
    if t == "BreadcrumbList": has_breadcrumb = True
    if t in ("Article", "BlogPosting"):
        has_speakable = "speakable" in data
        has_wordcount = "wordCount" in data
    if t == "FAQPage": has_faqpage = True
    if t == "Person" and "knowsAbout" in data: has_knowsabout = True

check(f"JSON-LD 區塊數量({len(blocks)})", len(blocks) >= 3)
check("Article schema", any(t in ("Article", "BlogPosting") for t in types))
check("BreadcrumbList", has_breadcrumb)
check("speakable", has_speakable)
check("wordCount", has_wordcount)
check("FAQPage", has_faqpage)
check("Person knowsAbout", has_knowsabout)
check("og:image", "og:image" in html)
check("twitter:card large_image", "summary_large_image" in html)
check("meta robots", "name=robots" in html)
check("閱讀時間", "分鐘閱讀" in html)
注意:Hugo 的
--minify會把<script type="application/ld+json">的引號去掉,變成<script type=application/ld+json>。如果 regex 還在找有引號的版本,就會全部找不到——這是一個很隱蔽的驗證陷阱。
Google 官方工具
https://search.google.com/test/rich-results
貼入文章 URL,可以視覺化確認 Article、BreadcrumbList、FAQPage 三個 schema 是否都通過驗證。
成果
跑完完整驗證後的結果:
[1] robots.txt
  ✅ 非 Cloudflare managed
  ✅ Allow PerplexityBot / ClaudeBot / GPTBot
  ✅ Sitemap 指向

[2] llms.txt
  ✅ 存在並包含文章清單與作者專長

[3] Article schema
  ✅ JSON-LD 3 個區塊(Person / Article / BreadcrumbList)
  ✅ BreadcrumbList
  ✅ speakable
  ✅ wordCount
  ✅ Person knowsAbout
  ✅ FAQPage(5 個 Q&A)

[4] Meta tags
  ✅ og:image
  ✅ twitter:card summary_large_image
  ✅ meta robots
  ✅ canonical

[5] UX
  ✅ 閱讀時間顯示
小結
SEO 是讓人找到你,AEO 是讓 AI 引用你。兩件事現在都要做。
對 Hugo 靜態網站來說,實作成本不高,大多數改動都在 layouts 和 config,不需要動到文章內容本身。最麻煩的反而是 Cloudflare 那兩個預設行為——Managed robots.txt 和 AI bot 封鎖——如果不知道,可能花很多時間找不到原因。
這篇文章記錄的所有改動,歡迎直接參考或借用。